How to upload and process your data with different drones
To begin, you must have completed your capture mission. The steps to complete your capture mission can be found at how to create a new mapping mission with DJI PILOT.
Required Files for Processing
Before we dive into the step-by-step process of uploading and processing your DJI P1 RGB data with DroneMaps, let's ensure you have all the necessary files in order.
Supported Drones:
- Mavic 3 Enterprise (M3E)
- P4RTK
- M300RTK + P1(35mm)
- M210RTK
- Explore2 + Vision1(35mm)
GPS Processing:
- Photos Only
RTK Processing:
- Rover log (.OBS) - Required: This file captures the Rover's log data and is essential for precise geospatial processing.
- Raw rover log (.BIN) - Required: The raw rover log file complements the (.OBS) file and enhances data accuracy.
- Timestamps log (.MRK) - Required: Timestamps log is a must for synchronization and ensures seamless data processing.
- Photos - Required: Your visual data is essential, adding a layer of depth and understanding to your geospatial insights.
- Navigation File (.NAV) - Optional: While not required, including the navigation file can enhance your processing experience, providing additional context to your geospatial data.
How To Upload And Process Your Drone Data
Processing your drone data begins with uploading it to the DroneMaps platform. DroneMaps simplifies the processing by automating the majority of settings, significantly reducing the need for manual adjustments.
Note: RTK (Real-Time-Kinematics) data must be present in your dataset to process correctly and achieve accuracy. For detailed information on RTK, simply scroll down to the bottom of the page to explore our comprehensive tips and best practices section, or to jump directly to the insights you need.
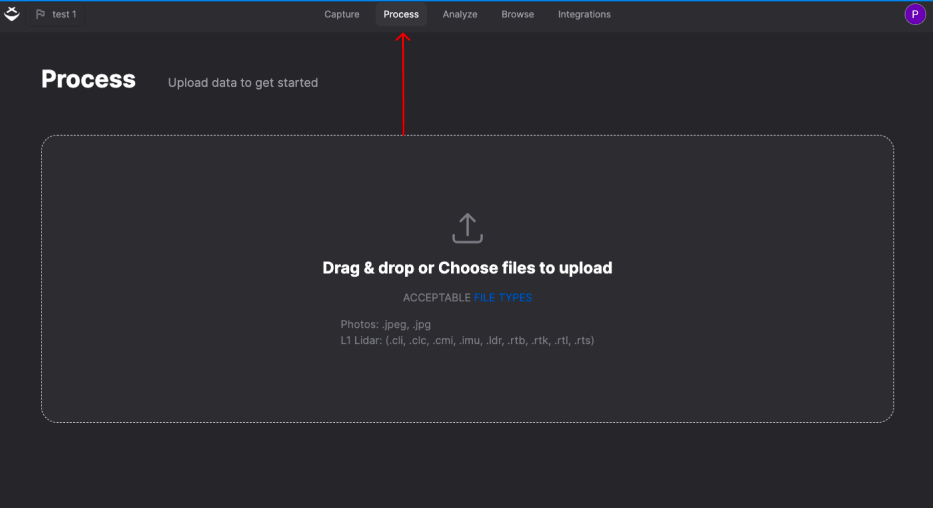
Step 1: Accessing the Upload Interface
- Log in to your account on DroneMaps.
- Once you've successfully logged in, you will be directed to the dashboard. Here, you will see the "Process" tab located at the top of the screen. Click on it to access the Upload interface.
 Note: The amount of photos you can upload and process at one time is less than 5000.
Step 2: Uploading Your Data
To initiate the upload process, you have two options:
-
Drag and Drop: Simply drag your prepared Drone Name Mission folder from your computer and drop it onto the designated area within the processing interface.
-
File Selector: Alternatively, you can click on the file selector area to open your computer's file explorer. Browse and select the prepared Mission folder containing your Drone Name data.
Note: The time required for the upload may vary depending on the size and quantity of your data. If you are having issues with uploading, please refer to the specific required files for LiDAR processing.
Step 3: Initiate the upload process
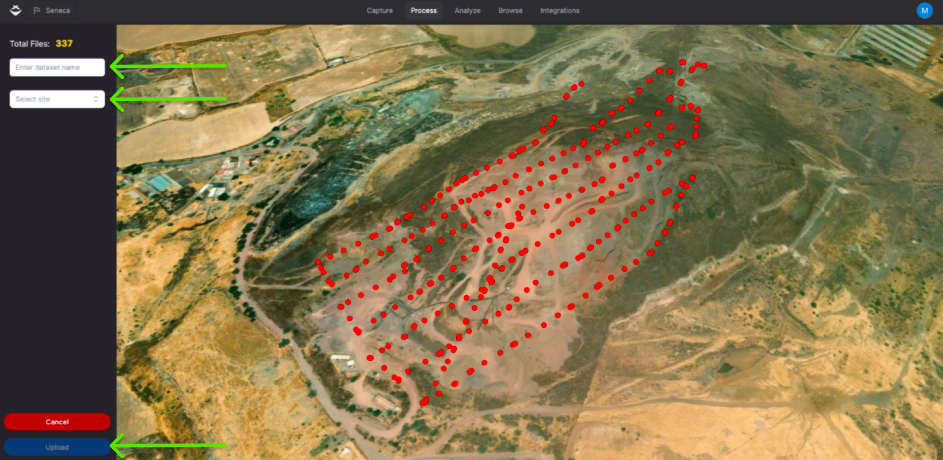
Once you've imported your dataset, you'll be greeted with an overview of the geographical area covered by your mission. Here's how you can kickstart the upload for processing:
- Customize Your Dataset Name: On the left-hand side, you'll spot an interactive field for giving your dataset a distinctive name. Provide a name that resonates with your project, making it easily recognizable.
- Select Your Site: Just below the naming field, you'll find the "Select Site" option. Choose the specific site where you intend to process this dataset. This step ensures your data aligns perfectly with the intended location.
- Launch the Upload: To set your dataset on its processing journey, simply click the "Upload" button located at the bottom left corner.
Tips and Best Practices
RTK Limitations & Known Issues
Keep a close watch on RTK Fix during your flights, aiming for it to remain above 85%. Maintaining a strong RTK link quality is vital for accurate calibration and reconstruction processes. Lower RTK Fix percentages, below 85%, may lead to processing challenges.
Check Your Internet Connection
Ensure you have a stable and high-speed internet connection during both the upload and processing phases. A reliable connection prevents interruptions and speeds up data transfer.
Monitor Processing Progress
To stay informed about the progress of your data processing, simply navigate to the browse screen on our platform. Here, you can easily track the status and review the results. Monitoring the processing progress is essential for promptly addressing any issues or errors.
What’s Next?
Visualize Your Data
To gain valuable insights and explore your processed dataset further, we recommend visualizing it on our platform. Visualization allows you to interact with your data, analyze it, and make informed decisions. Follow our step-by-step guide on how to visualize your geospatial dataset.
Export Your Processed Data
After successfully processing your data, you can begin exporting your dataset in the desired output format. Whether you need orthophotos, point clouds, or other data formats, DroneMaps offers seamless exporting options.
Need more help? contact us for support